A contact page typically gets more page views than any other pages on a website. It’s where visitors find ways to contact and connect with a business. As a website owner, these attempts of contact and connect are valuable – it’s where relationships with your potential customers begin.
Unfortunately, we’ve all seen too many contact pages that have been hastily thrown together like an afterthought. Your contact page definitely deserves more attention.
In this article, we will go over some of the best practices as well as show you how to create a killer contact page for your website.
Contact page best practices
Here are some of the best practices:
1. Keep it simple
You don’t want to put too many barriers between your visitors and the contact information they are looking for. Keep your contact us page short, sweet and to the point.
2. Give visitors what they want
When you set up your contact page, make is easy for visitors to get in touch with you. For example, if you choose to use a contact form, only ask for the essentials (such as name, email address and their message). Unless absolutely required, toss out the mandatory mailing address, phone numbers and checkboxes. Form fields like those are a major turn-off.
3. Make it gorgeous
When visitors use your contact us page, they are opening themselves for a relationship with you. They want to know more about you, so pay attention to your contact us page’s design. You want your visitors to be excited to contact you.
4. Show off your personality
Your copy should reflect your brand persona. If your audience is the casual crows, consider a light-hearted or even comical tone for your contact us page. You also want your contact us page to match the rest of your website.
5. Show people where and when to find you
If you are going to include your address on your contact us page, use a map to pinpoint the location for your visitors. This way, they can easily identify relevant interactions and transit routes. You might also want to include your hours of operation so visitors know what hours to call and don’t turn up to closed doors.
6. Include an alternative call-to-action
You want to keep visitors on your website, especially if they decide not to complete your contact form. Provide them with another option, such as a link to your featured product or blog post. You can also include links to your social media accounts like Facebook and Instagram.
7. Redirect to a thank-you page
Nothing frustrates visitors more than to know now if their contact inquiry was sent through successfully. By redirecting them to a thank-you page or simply including a form submitted confirmation message will reassure them the form worked.
Creating your own contact page
All Website.com templates come with a contact page. You can easily customize it to better fit your needs, i.e. add your own text and images. You can also use one of the contact page layouts to get the job done.
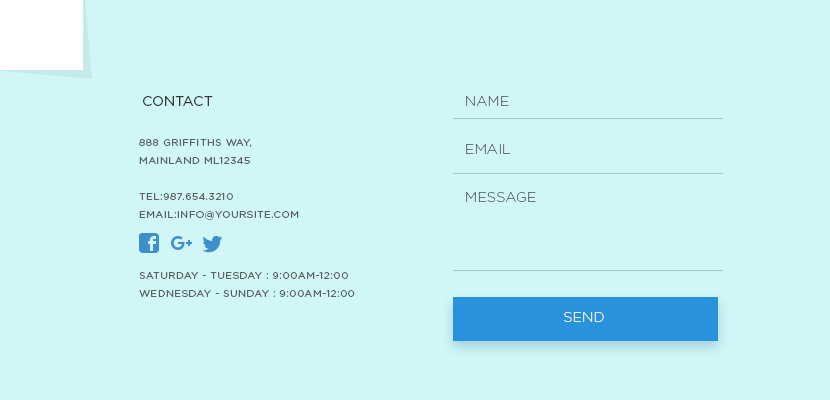
If you’d like, you can choose to create a custom contact page using one the blank page templates and then add in the desired elements. Take a look at this contact page, it was created using a blank page template.

Let us show you how it’s done.
1. Open your Website.com editor.
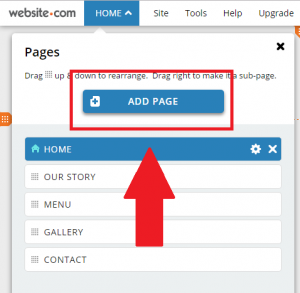
2. Click Add from the side menu and select Pages. Click Add Page.
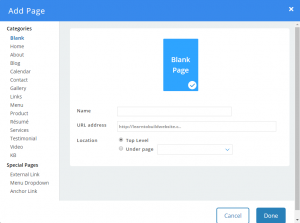
3. From the page Categories, select Blank. Enter the page name (i.e. Contact) and when ready, click Done.
Now that the page is created, we can go ahead and add in the various elements. Let’s start with the left side (contact form). We will begin by adding a section title.
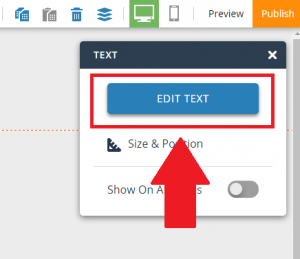
4. Click Add and select Text. Click Section Title and the placeholder title will be added to your page. Drag the title to the left side of the page and click on it to open the text editor to change the text.
5. Next, we will add the contact form. Click Add on the side menu and select Contact. Under Webform, select the desired form style.
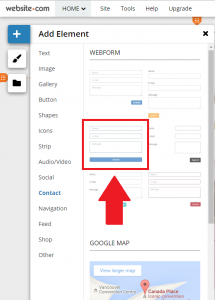
6. Again, drag and drop the form onto the left side of the page, underneath the section title. By default, the form comes with the basic fields: Name, Email, and Message. If you want to add additional fields or rename the existing field labels, click on the form to open the form editor.
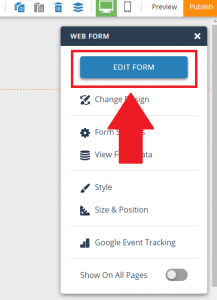
If you need further assistance with editing form fields, our step-by-step help article.
Other helpful articles:
Now that you’ve added the contact form, we can go on and add the elements onto the right side of the page. Again, we will first need to add the section title.
7. Click Add and select Text. Click Section Title and the placeholder title will be added to your page. Drag the title to the right side of the page and click on it to open the text editor to change the text.
8. Next, we will add in the contact phone number and other important information. Click Add and select Text. Click Paragraph.
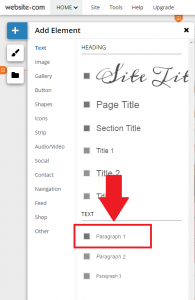
The placeholder title will be added to your page. Drag the title to the right side of the page and click on it to open the text editor to change the text.
9. If you have active social media profiles, such as Twitter or Facebook, it’s a good idea to add them onto your contact page. Instead of adding each one individually, you can use the Social Link Bar element to easily add and organize all your social icons. Click Add and select Social. Then select the desired bar design under Social Link Bar.
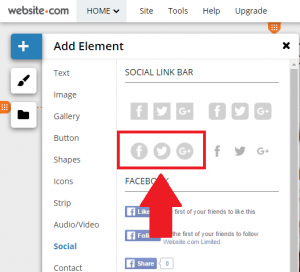
10. Drag the placeholder link bar to the right side of the page, underneath your contact information. Click on it to open the icon organizer.
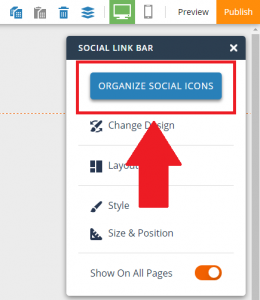
Using the icon organizer, you will need to enter your social media profile URL for each of the icons you want to display. This will allow our system to bridge the icon to your social media profile page.
If you need detailed instructions, you can follow our help article on the Social Link Bar for step-by-step instructions on how to add, remove, connect and organize your social icons.
Now that you’ve added the contact form, phone number, and social media icons, let’s add the address and map.
11. Click Add and select Contact. Click on the map under the Google Map section.
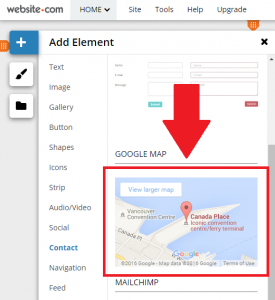
The placeholder map will be added to your page. You can drag and drop it to the bottom of the body area, underneath the contact form and social icons bar. You can also use the corner handles to resize the map so that it better fits the page.
12. Next, click on the map to open the map editor.
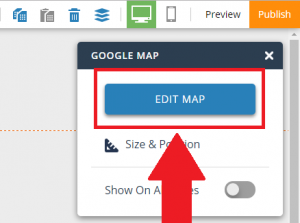
13. Enter your address into the address field. This will remove the default address on the map and replace it with your actual address.
You’re done! With all elements added, your contact page should now look something like this: