Want to set up email forwarding for your domain email account with Website.com? When you set up email forwarding, emails received to your domain email account are automatically sent to another email account inbox. It’s a great way to consolidate your emails in one place, or ensure you don’t miss a message if you mostly use a specific email account.
How to Set Up Email Forwarding:
- Log into your domain email account with Website.com.
- On the top, click More > Settings.
- Scroll down to see Forwarding.
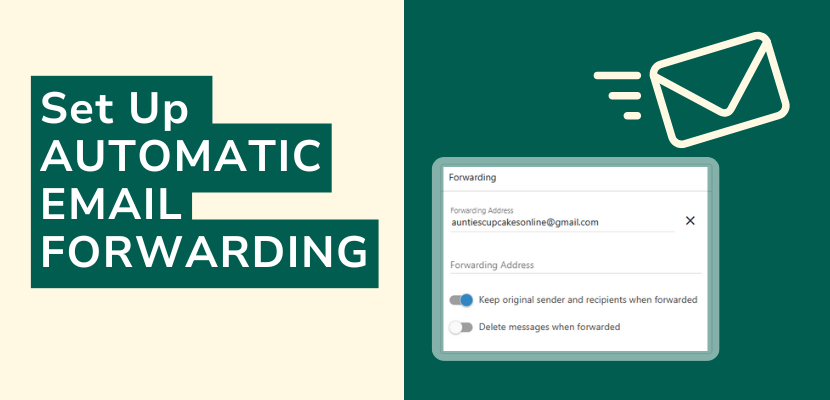
- Input the email address you would like all emails to be forwarded to. If you’d like more than one forwarding address, add the other email address on the new field line.
- Choose your forwarding settings:
- If “Keep original sender and recipients when forwarded” is toggled on, once the email is forwarded from your domain email account to your forwarding email address, it will show the original sender information in your forwarding email address. If it is toggled off, the forwarded email will appear to be sent from your domain email address, rather than the original sender.
- If “Delete messages when forwarded” is toggled on, once emails are forwarded from your domain email address, it will be deleted from your domain email account. If it is toggled off, you will keep a copy of the incoming email in both your domain email account and your forwarding email address account.
- Once you’re happy with the settings, scroll up and click “Save” in the top left.
Here’s a video demonstrating these steps, transcript below!
Transcript:
Hi there! Here’s a video to show you how to set up forwarding for your domain email account with website.com.
You may want to set up forwarding so that emails received to your domain email account are sent to another email account inbox that you have.
This is a great way to consolidate your emails in one place, or ensure you don’t miss a message if you predominantly use a certain email account.
To set up forwarding for all of your incoming mail, we’re logged into our domain email account.
And we’ll click More and then Settings.
Now scroll to where you see Forwarding, and you can input the email address that you would like all incoming emails to be forwarded to.
If you would like the emails sent to more than one email address, you can add another one on the other line.
Now you can choose to Keep original sender and recipients when forwarded. This means that when the email is forwarded to the other email address, it will send the email from the original sender, keeping that information visible.
When this is toggled off, the forwarded email will be sent as a forwarded email, appearing to be sent from my domain email account.
So I do want to make sure the original email sender is visible when the emails are forwarded, so I will toggle this on.
If you want the emails to be deleted from your domain email account as soon as they are forwarded, you can toggle on the Delete messages when forwarded toggle.
I will keep that toggled off.
When you’re happy with that, click Save at the top.
Now you’re done!
If you want to see this in action, I have another email account open in another tab (info@createyourwebsitenow.com).
I will send an email to the domain email address.
And now let’s open up the email account that I set up as the forwarding address.
And here it is, the email has now been forwarded to this forwarding address.
You can see the original sender.
That’s it! As you can see, it’s very simple to set up email forwarding to consolidate your emails or make sure you catch all the emails in your most prioritized email account.
If you want more tips and tutorials for domain emails or websites, make sure you subscribe to @websitedotcom. Thanks for watching!