With AI tools and the Website.com site builder, you can create a polished website in just a few simple steps. Read below or watch our video tutorial to see how easy it to to make your website using AI.
Step 1: Use AI To Create Content
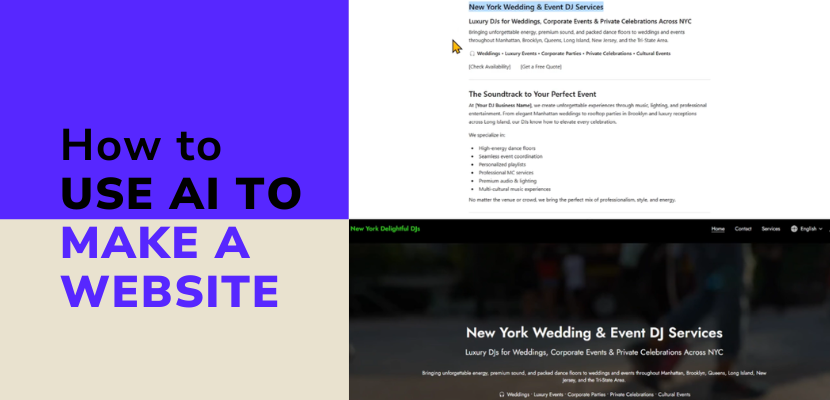
Start by using AI to generate the text for your website. You can ask an AI tool like ChatGPT or Gemini to write homepage copy, service descriptions, About pages, FAQs, and more.
For example, you could use a prompt like:
“Write a homepage for a DJ business specializing in weddings and events.”
Within seconds, AI can generate professional content that you can customize to match your brand voice. You can also ask it to make the tone more casual, SEO-friendly, or location-specific.
Step 2: Tweak Content Output
Once the AI creates your content, review and edit it so it feels authentic to your business.
You might:
- Shorten paragraphs
- Adjust the tone
- Add local keywords
- Remove repetitive sections
- Add social proof or testimonials
Think of AI-generated content as your first draft. It’s a fast starting point that you can personalize.
Step 3: Choose a Template from Website.com Site Builder
After your content is ready, head over to Website.com, create an account, and choose a template that matches the style of your business.
Don’t worry if the template isn’t made specifically for your industry. Colors, images, layouts, and sections can all be customized later.
Choose a design that has the overall look and feel you want, then start building from there.
Step 4: Input Content in Site Builder
Now it’s time to copy and paste your AI-generated content into your website builder.
Simply click on sections like:
- Hero banners
- About sections
- Services
- Testimonials
- Contact forms
Then replace the placeholder text with your own content by pasting right on the template, or in the left side panel for the corresponding field.
You can also:
- Add buttons and links
- Create new pages
- Edit navigation menus
- Rearrange sections
The Website.com site builder makes it easy to see changes in real time without needing technical experience.
Step 5: Change Images, Delete Unnecessary Website Sections
Customize your site further by replacing template images with your own branding photos or selecting copyright free images from the built-in library.
You can also remove any sections you don’t need with a single click. If a template has ant sections that aren’t relevant to your business, simply click on that section, and click the garbage can icon to delete them.
This helps keep your website clean, focused, and professional.
Step 6: Publish to Go Live!
Once you’re happy with your design and content, click the publish button to make your website live online.
One major advantage of using a site builder is that your website will automatically be mobile responsive, meaning it will look great on phones, tablets, and desktops without needing any extra steps! To preview the different modes, just go to Preview and click on the phone or tablet icons.
A Word To The Wise: Why Using a Website Builder with AI Is Easiest For Beginners
Now, you might be wondering, can AI just generate a full website with code without needing a website builder? The answer? Kind of! While AI can generate HTML, CSS, and even images, there’s a catch: you’ll need your own hosting service to actually make the site go live. That means setting up your own hosting environment and maintaining the security updates yourself.
Another tricky part is that you won’t know exactly how your site will look or behave until everything is properly hosted and configured. And for beginners, that process can get complicated pretty fast.
So the best approach? Use AI to help you generate the content as a starting point, and use a site builder like Website.com to handle the technical side.
Watch our video tutorial to take you through these steps in real time!
Transcript below:
Hi everyone. In this quick tutorial, I’m going to show you how you can use AI to help build your own website without needing to be a developer.
Step one, use AI to create your content. You can ask an AI tool to write things like your homepage text, product descriptions, or content for all of your pages. Just describe your business or idea, and the AI platform can generate clean, professional content in seconds.
You can also refine it, ask for a more casual tone, shorter paragraphs, or SEO friendly wording. For example, you might put in this prompt, write a homepage for a DJ business for events and weddings.
From there, tweak the output until it sounds right for you. For example, I’ve generated this content
If I want to optimize this content so that it targets a certain location, I might say optimize for New York.
Now you can do this for every page you want to include on your website like an about page, contact page or services page.
Once you have that content, you can use it as your draft and you can edit it so that it fits your branding perfectly.
Step two is to build your website using a site builder. So once you have your content ready, you can head over to Website.com. I have that open in my tab and I’ve already created my account and I’ve logged in. So, here is the website builder and the template that I started with. And now we can start to put everything together.
You want to start with a template that fits the vibe of your business. So, we’re going to click on template library. And keep in mind that the template you choose doesn’t have to fit the industry. The images and colors can be customized.
For example, I might want to choose this template right here.
And I’ll click select this template.
The Website.com site builder is designed to be extremely simple. Just customize or add pre-built sections, paste in your AI generated content, then customize your layout, colors, and images. This is the easiest way to go from idea to live website quickly, especially if you’re not technical. So, let’s go ahead and drop in the content. So, I’ll go back to the AI tool.
And I’ll copy and paste from here.
So, I’ll click first on the hero section.
Here is the title. So, I’ll just paste that there. And now, let’s get the subtitle.
I’ll grab the description.
And now I want to toggle on some buttons. So I’ll toggle on the primary button and I’ll also add a secondary button.
Now, keep in mind I’ve added in the content for these buttons, but I haven’t linked it to anything. Later on, when we’ve customized more pages, you can easily add the link that you want. To add a link, just click underneath where the label is.
So, where it says primary button, I’ll click here. We’ll click on, for example, page. And now you can choose where you want the button to leave visitors to go.
For example, I might want this to go to the contact page. It did come with the template. So, I’ll click there and then click save.
Now, you can add appropriate sections to fit your content in by clicking add section. If the template already has the section, you can just click to edit right on that content.
But, for example, this next part here is sort of an about section. So, I’ll click on about. You can choose a layout that you like and we’ll continue to copy and paste.
You can also copy and paste right on the template itself.
I don’t need this subtitle, so I’ll toggle that off. And you’ll notice that I didn’t even put the business name.
So, I’ve put that content in. If you want to change the image that comes with the section, you can just click on it.
And let’s take a look. You can click select from files and choose to upload your own images. That’s the best way to get a branded experience across your website.
You can also choose from stock images that come with the site builder.
For example, I might want to choose this one. And you’ll see that looks great. If you don’t want these buttons, you can toggle them off.
Or again, you can change the labels and then where they lead to. And let’s take a look what we have here. If you don’t like any of the sections that are on the page, all you have to do is click on that section and then click the delete section button right here and that will remove it.
I’ll go back to the AI tool and we’ll continue to throw in more sections and more content.
I’ll throw in another about section.
For this one, I’ll toggle off the media.
And if you want to change any of the font sizes for the description on the left, you can highlight that
and you can play around with the font size there. Again, we don’t need this subtitle, so I’ll toggle that off. I’ll make some tweaks to the text.
I don’t want to add this content. I think it’s a bit too repetitive. But I do like how there’s some social proof. So, I’ll add that.
In this section, I want to toggle these buttons off. Let’s add a section.
Maybe I’ll add a list section.
If you want, you can elaborate more and ask AI. If you want, you can generate more content to fill this in. But instead, I will toggle each of these sections off. I want that one. For each of these blocks,
I’ll just keep the title for each block.
That’s what that looks like so far. I also want to toggle it off here
for the section itself.
I’ll add one more block. So all you have to do is when you’ve clicked on the section, click add item.
And now we’ve customized that. Let’s also add this client reviews section.
We’ll add testimonials.
For example, let’s add this style right here. And of course, you’ll have your own client reviews, but just for this video, you’ll see
So you’ll see that it looks like this. If you only have three, for example, to delete one of these blocks, just click right here under the item. We’ll delete this one. And now we have three testimonials.
Now, on the homepage, I want to make sure that there’s an easy way to contact you. So, we’ll add add section. First, I’ll add an address and map section,
put in your address, and then you can fill in your contact information. Here we’ll also add a contact form. So, we’ll click add section again. We’ll click contact.
I’ll use some of the text here.
We don’t want this section here. So, we’ll make sure we delete that one as well. And I’ll also put in my business name in the header.
Now we’re done with the homepage. If the template already has the pages that you want for the rest of the website, you can take a look by clicking on the home icon here and then clicking on manage pages. And then you can click on the page and then you can edit it with the content that you created with AI just like how I did the homepage. If you want to add a new page, just click add new page and then choose the type of page you want to add. For example, you might want to add a services page and then click add page to menu. Give that a title. And now you’ve added the page. If you want to delete any of the pages that came with the template, for example, if you want to delete how it works, just click on the pencil icon beside that and then click delete page.
So, go ahead and add or edit the pages that you need. Just paste the content that was created using your AI tool until you’ve completed all of the website pages. The great thing about the Website.com site builder is that it will automatically create a responsive version of your website. So you don’t need to make a mobile version of your website. For example, I’ll go to preview.
This is the site that we’ve created so far. And you can take a look at the mobile version just by clicking on that icon.
So this is what the site looks like on a phone.
Now, you might be wondering, can AI just generate a full website with code without needing a website builder? And the answer is kind of. AI can generate HTML, CSS, and even images. But here’s the catch. You’ll need your own hosting service to actually make the site go live. That means setting up your own hosting environment and maintaining the security updates yourself.
Another tricky part is you won’t know exactly how your site will look or behave until everything is properly hosted and configured. And for beginners, that process can get complicated pretty fast.
So the best approach, use AI to help you generate the content as a starting point and use a site builder like Website.com to handle the technical side so you can see your website design in real time. When you’re ready to make everything go live on the site builder, just click publish right here.
And now your website is live and online. That’s it for this quick guide. If you found it helpful, feel free to like and subscribe. And I’ll see you in the next video!